Here are the best design resources I found while surfing this week:
General Reading:
A Comprehensive Guide to Web Terminology via PelFusion
25 Super Web-based HTML & CSS Tools via AppStorm
Designing with Web Standards via Layers Magazine
100 + Must Have Cheat Sheets and Quick References For Web Designers and Developers via Designbeep
The Beginner's Guide To SEO
Freelancing/Job Hunting:
Cold-Calling via Inc.
Tutorials
Design a Beautifully Detailed Web Button via WebDesignTuts+
25 Cool light effect tutorials in Photoshop via MachoArts
Freebies:
Tree Bark: Texture Pack via Design Instruct

Friday, February 11, 2011


Friday, February 4, 2011
Resources of the Week - Feb 11/2011
Here are the best design resources I found while surfing this week:
Events:
FITC Toronto - A Flash and Interactive Content Developer Conference
General Reading:
8 Tips for Freelance Designers to Get Paid Faster via Designmodo
What Everyone Ought to Know about Initial Client Meeting via 1wd.co
6 Essential Things All Freelancers Should Be Doing via Six Revisions
15 Best Resources in Designing a Perfect Business Card via iBrandStudio
Four Constants in the Ever-changing Web Design Industry via Six Revisions
Must Read Links for Web Designers and Developers – Volume 1 via TechKing
Tutorials
Text Effects Session via PSDTuts+ (a series of interesting text effects)
Start Using the Brush Tool – Basix via PSDTuts+
Create an Awesome Typographic Piece of Art in Photoshop via TechKing
Software
NexusFont - great free font manager
Freebies:
5 Free Business Card PSD's via Designmodo
Huge Collection of 55 Vector Silouettes Free to Download via designresourcebox
Premium Icon Freebies From The Design World – 35 Icon Sets via designresourcebox
Free Serif Fonts – Tradition of Typography via cruzine
Events:
FITC Toronto - A Flash and Interactive Content Developer Conference
General Reading:
8 Tips for Freelance Designers to Get Paid Faster via Designmodo
What Everyone Ought to Know about Initial Client Meeting via 1wd.co
6 Essential Things All Freelancers Should Be Doing via Six Revisions
15 Best Resources in Designing a Perfect Business Card via iBrandStudio
Four Constants in the Ever-changing Web Design Industry via Six Revisions
Must Read Links for Web Designers and Developers – Volume 1 via TechKing
Tutorials
Text Effects Session via PSDTuts+ (a series of interesting text effects)
Start Using the Brush Tool – Basix via PSDTuts+
Create an Awesome Typographic Piece of Art in Photoshop via TechKing
Software
NexusFont - great free font manager
Freebies:
5 Free Business Card PSD's via Designmodo
Huge Collection of 55 Vector Silouettes Free to Download via designresourcebox
Premium Icon Freebies From The Design World – 35 Icon Sets via designresourcebox
Free Serif Fonts – Tradition of Typography via cruzine
Thursday, February 3, 2011
Walking the Talk
There has been a lot of chatter on the Twitter about life-long learning and how we embody that as professionals and instill the same into our students. It is very easy to say you are a life-lon g learner and perhaps just as easy to extol the virtues of it to your students. However, I find when trying to instill new habits, a little bit of modeling can go a long way.
If you want your students to become life-long learners you need to not only talk about it - you need to demonstrate it. Start the class with a comment like "I just found this yesterday ..." or "I just learned about this and wanted to share it ...". Show students that knowledge is not something that can be amassed and then ignored.
So, to ensure that I walk my talk I have decided to add a weekly post summarizing the best design and coding resources I have stumbled upon during that week. I normally post them to my class wiki site however things have a way of becoming buried in there.
 So what do you think? Is this an idea you could adapt to your classroom? How else can you show your students the benefits of life-long learning through not just your talk but also through your actions?
 g learner and perhaps just as easy to extol the virtues of it to your students. However, I find when trying to instill new habits, a little bit of modeling can go a long way.
If you want your students to become life-long learners you need to not only talk about it - you need to demonstrate it. Start the class with a comment like "I just found this yesterday ..." or "I just learned about this and wanted to share it ...". Show students that knowledge is not something that can be amassed and then ignored.
So, to ensure that I walk my talk I have decided to add a weekly post summarizing the best design and coding resources I have stumbled upon during that week. I normally post them to my class wiki site however things have a way of becoming buried in there.
 So what do you think? Is this an idea you could adapt to your classroom? How else can you show your students the benefits of life-long learning through not just your talk but also through your actions?
Resources of the Week - Feb 4/2011
Here are the best design resources I found while surfing this week:
General Reading:
5 Pitfalls to Avoid for New Web Designers from webdesign tuts+
How to Tell When Your Rates are too Low from FreelanceSwitch
16 Useful and Free eBooks for Web Designers and Developers from Skyje
Inspriation:
The Crazy Evolution Of 10 Major Brands' Logos
Tutorials
Best of the Web - Jan 2011 from psd tuts+
Photoshop Basix video tutorial series from psd tuts+
Futuristic Space Scene from PixelTango
Freebies:
150 Free Business & Application Icons from graphicriver
30 Fun Free Blogger Templates from Tintation
General Reading:
5 Pitfalls to Avoid for New Web Designers from webdesign tuts+
How to Tell When Your Rates are too Low from FreelanceSwitch
16 Useful and Free eBooks for Web Designers and Developers from Skyje
Inspriation:
The Crazy Evolution Of 10 Major Brands' Logos
Tutorials
Best of the Web - Jan 2011 from psd tuts+
Photoshop Basix video tutorial series from psd tuts+
Futuristic Space Scene from PixelTango
Freebies:
150 Free Business & Application Icons from graphicriver
30 Fun Free Blogger Templates from Tintation
Friday, January 28, 2011
An Introduction to Glogster
Note: This is an accompaniment to my article Word Clouds, Collages, and Glogs - Oh My! published in the January 2011 issue of STAO Crucible.
Glogster EDU is a website that will allow you to create interactive posters. Sign-up is free and as an educator provides you with the ability to create student accounts.
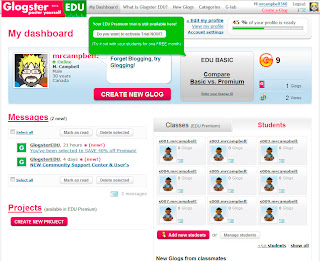
Upon arriving at the Glogster EDU site, choose Register from the top right corner. Fill out the details to create your new Glogster account. You will then be taken to your personal dashboard.
Here you can create a new glog by clicking on the Create New Glog button near your profile description (note that Glogster requires you to have Adobe Flash Player installed). This will present you with a blank 'canvas' upon which to create your new masterpiece
.
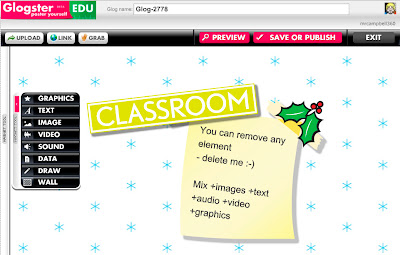
The toolbar on the left has a variety of built in graphics, text layouts, images, and backgrounds to play with. You can also add in video and audio or other files (such as .pdf) on the wall. Finally the Draw option allows you to do whatever you like by painting on the screen. You can give your glog a name at the top of the screen and choose Save Or Publish to either save your work or publish it to the public gallery.
Glogster provides a unique way for students to express themselves graphically. It is fun and easy to use. So what are you waiting for ... get glogging!
Glogster EDU is a website that will allow you to create interactive posters. Sign-up is free and as an educator provides you with the ability to create student accounts.

Upon arriving at the Glogster EDU site, choose Register from the top right corner. Fill out the details to create your new Glogster account. You will then be taken to your personal dashboard.
Here you can create a new glog by clicking on the Create New Glog button near your profile description (note that Glogster requires you to have Adobe Flash Player installed). This will present you with a blank 'canvas' upon which to create your new masterpiece
.

The toolbar on the left has a variety of built in graphics, text layouts, images, and backgrounds to play with. You can also add in video and audio or other files (such as .pdf) on the wall. Finally the Draw option allows you to do whatever you like by painting on the screen. You can give your glog a name at the top of the screen and choose Save Or Publish to either save your work or publish it to the public gallery.
Glogster provides a unique way for students to express themselves graphically. It is fun and easy to use. So what are you waiting for ... get glogging!
Wednesday, January 26, 2011
An Introduction to Wordle
Note: This is an accompaniment to my article Word Clouds, Collages, and Glogs - Oh My! published in the January 2011 issue of STAO Crucible.
Wordle is a website that will allow you to create word clouds. There is no sign-up necessary (or available at all) and the site is completely free.
Upon arriving at the site you will see some of the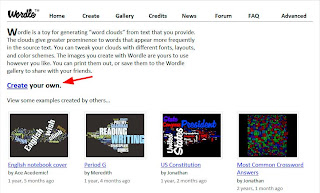 latest creations made by users of the site. Click on Create your own (marked by red arrow) to begin your masterpiece.
You will then be prompted to paste in a block of text. Wordle will analyze the word frequencies in the text to produce the word cloud. Words that appear more frequently will appear more prominently in the cloud. Press the Go button after you have entered your text to create your Wordle.
Along the top of your Wordle you will find options that allow you to tweak the design a bit (by adjusting font, colour, word layout). However, you will find that the overall design is produced by the site and is mostly random.
When you are happy with the final product you have a couple options to preserve it for posterity. There is a Print button just underneath the Wordle. If you have the ability to print to PDF (CutePDF is free software that will allow you to do that), you could save it that way. The other option is to use the Print Screen button on your keyboard (normally located in the upper right portion of your keyboard; on some computers needs to be coupled with CTRL or FN to work). You will have a copy of your scree placed on your clipboard. You can then paste it into either a picture editor (like Microsoft Paint) or a word processor (like Microsoft Word) to edit it.
That is about it for the site. It is extremely easy to use and can be a great way to review vocabulary for a unit. One last item to mention would be the advanced options (available from the menu bar at the top of the site). Here you can enter words with a numerical weighting. Words with a larger weighting will appear larger in the Wordle.
Finally, a Wordle I created with the text of this article (a meta-Wordle perhaps?).
Wordle is a website that will allow you to create word clouds. There is no sign-up necessary (or available at all) and the site is completely free.
Upon arriving at the site you will see some of the
 latest creations made by users of the site. Click on Create your own (marked by red arrow) to begin your masterpiece.
You will then be prompted to paste in a block of text. Wordle will analyze the word frequencies in the text to produce the word cloud. Words that appear more frequently will appear more prominently in the cloud. Press the Go button after you have entered your text to create your Wordle.
Along the top of your Wordle you will find options that allow you to tweak the design a bit (by adjusting font, colour, word layout). However, you will find that the overall design is produced by the site and is mostly random.
When you are happy with the final product you have a couple options to preserve it for posterity. There is a Print button just underneath the Wordle. If you have the ability to print to PDF (CutePDF is free software that will allow you to do that), you could save it that way. The other option is to use the Print Screen button on your keyboard (normally located in the upper right portion of your keyboard; on some computers needs to be coupled with CTRL or FN to work). You will have a copy of your scree placed on your clipboard. You can then paste it into either a picture editor (like Microsoft Paint) or a word processor (like Microsoft Word) to edit it.
That is about it for the site. It is extremely easy to use and can be a great way to review vocabulary for a unit. One last item to mention would be the advanced
 options (available from the menu bar at the top of the site). Here you can enter words with a numerical weighting. Words with a larger weighting will appear larger in the Wordle.
Finally, a Wordle I created with the text of this article (a meta-Wordle perhaps?).
Thursday, January 13, 2011
Subscribe to:
Posts (Atom)