Showing posts with label tutorial. Show all posts

Tuesday, March 29, 2011

Installing XAMPP as a Portable Application

This tutorial will take you through installing XAMPP (Apache Server, MySQL, PHP, and Perl; the X is to indicate it is cross-platform) as a portable application on a USB drive. To complete this tutorial you should have a USB2.0 drive with at least 500 mb of free space available (I recommend a minimum of a 2Gb drive dedicated to this purpose).

We will be installing XAMPPLite as it is a bit smaller (approximately a quarter of the size at 277mb) of the current full install of XAMPP and therefore better suited to run off a stick. There is no XAMPPLite at the current version release of XAMPP, so we will download and install the last release (1.7.3).

Download the file from:

Once downloaded (the file is only 28.4mb) run the file.

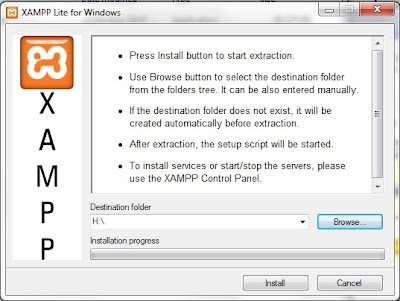
This window will appear. Ensure that your USB drive is plugged into a USB port on your computer. Select the letter assigned to your drive for the Destination folder shown to the left. Click on the Install button and go put your feet up for a bit (it will unpack the files to your drive which should take approximately 20-30 minutes).


Once the unpacking is finished a command prompt window will open and ask a series of questions:

  • Should I add shortcuts to the startmenu/desktop? (y/n)
Choose n (no) here as this is a portable install and you probably won't run it off this computer on a regular basis (otherwise do a normal install of XAMPP or a similar program).
  • Should I locate the XAMPP paths correctly? Should I proceed? (y/x=exit setup):
Choose y (yes) here as this is not really much of a choice (and is necessary for any install of XAMPP).
  • Should I make XAMPP portable without drive letters? Your choice (y/n):
Choose y (yes) here as USB drives can be assigned a different drive letter depending on what is already installed on the host computer. This will allow XAMPP to work regardless of the drive letter on the USB Drive. However, you will have to manually start XAMPP to work with it off the stick (as it will not be a service). This will be covered in the next tutorial.

You should now receive a number of lines indicating that programs are being relocated followed by a message saying that XAMPP is ready to use. Press the enter key to move to the next step.

XAMPP then indicates that it set the time zone for you and where to go to change that later (once again a future tutorial).

At this point you are presented with a menu of options. Choose x to exit the menu. Congratulations you are now the proud owner of a portable web server.

Friday, January 28, 2011

An Introduction to Glogster

Note: This is an accompaniment to my article Word Clouds, Collages, and Glogs - Oh My! published in the January 2011 issue of STAO Crucible.

Glogster EDU is a website that will allow you to create interactive posters. Sign-up is free and as an educator provides you with the ability to create student accounts.

Upon arriving at the Glogster EDU site, choose Register from the top right corner. Fill out the details to create your new Glogster account. You will then be taken to your personal dashboard.

Here you can create a new glog by clicking on the Create New Glog button near your profile description (note that Glogster requires you to have Adobe Flash Player installed). This will present you with a blank 'canvas' upon which to create your new masterpiece


.


The toolbar on the left has a variety of built in graphics, text layouts, images, and backgrounds to play with. You can also add in video and audio or other files (such as .pdf) on the wall. Finally the Draw option allows you to do whatever you like by painting on the screen. You can give your glog a name at the top of the screen and choose Save Or Publish to either save your work or publish it to the public gallery.

Glogster provides a unique way for students to express themselves graphically. It is fun and easy to use. So what are you waiting for ... get glogging!

Wednesday, January 26, 2011

An Introduction to Wordle

Note: This is an accompaniment to my article Word Clouds, Collages, and Glogs - Oh My! published in the January 2011 issue of STAO Crucible.

Wordle is a website that will allow you to create word clouds. There is no sign-up necessary (or available at all) and the site is completely free.

Upon arriving at the site you will see some of the latest creations made by users of the site. Click on Create your own (marked by red arrow) to begin your masterpiece.

You will then be prompted to paste in a block of text. Wordle will analyze the word frequencies in the text to produce the word cloud. Words that appear more frequently will appear more prominently in the cloud. Press the Go button after you have entered your text to create your Wordle.

Along the top of your Wordle you will find options that allow you to tweak the design a bit (by adjusting font, colour, word layout). However, you will find that the overall design is produced by the site and is mostly random.

When you are happy with the final product you have a couple options to preserve it for posterity. There is a Print button just underneath the Wordle. If you have the ability to print to PDF (CutePDF is free software that will allow you to do that), you could save it that way. The other option is to use the Print Screen button on your keyboard (normally located in the upper right portion of your keyboard; on some computers needs to be coupled with CTRL or FN to work). You will have a copy of your scree placed on your clipboard. You can then paste it into either a picture editor (like Microsoft Paint) or a word processor (like Microsoft Word) to edit it.

That is about it for the site. It is extremely easy to use and can be a great way to review vocabulary for a unit. One last item to mention would be the advanced options (available from the menu bar at the top of the site). Here you can enter words with a numerical weighting. Words with a larger weighting will appear larger in the Wordle.

Finally, a Wordle I created with the text of this article (a meta-Wordle perhaps?).

Thursday, January 13, 2011